Build your own solar power generating system and you’ll make the world a greener place while also saving money. First, on the cost of the system itself, and second, by reducing your monthly utility bill. But the primary benefits to you in a DIY project is the fun you’ll have gaining hands-on knowledge of how to build your own projects, creating useful devices and customizing what you build for your needs.
DIY Solar PanelsBenefits:
Build a functioning solar panel that can charge your personal electronics and more. Learn how photovoltaic systems work.
Cost: $90 to $125
Food CookersBenefits:
Cook without using electricity or burning fossil fuels.
Cost: $20 and more
Small ProjectsBenefits:
Build handy devices that you can use around the home and garden, and while camping or working off the grid.
Cost: $10 and more
DIY Solar Panel Plans
Building a solar panel power generating system is more complex than simply following the instructions in an Ikea box. Planning will make your project easier and more successful. Building a solar panel from scratch requires a basic understanding of electricity (watts, volts, amps), as well as the ability to solder connections. You need familiarity with simple electrical testing equipment, and access to basic carpentry tools to cut and drill wood and aluminum. If you plan to place your panel in a permanent location, you need to know how to mount the panel on your roof without causing damage, or set a post in the ground. Allocate sufficient time – DIY solar panels are not one-day projects. But if you can build a deck, you can build your very own solar power system.
The table below sketches out the rough costs to create your own 60-watt panel. You’ll probably notice that the cost of creating your own panel is about the same as buying a ready-to-use panel. Don’t let this discourage you from building your own panel. Think of this as a chance to learn more about how photovoltaic (PV) systems work.
Component
Sources
Tools Required
Skill Level Required
Approx. Cost
Solar Cells (36 1.75-Watt)
Amazon, eBay
Soldering iron; gloves
Moderate to high
$45 to $65
2 acrylic panels (or glass)
Local glass store
Saw; utility knife; mask
Low
$20 to $30
Aluminum frame (or wood)
Local lumber store
Appropriate saw
Low
$20 to $25
Silicon sealant
Local hardware store
Caulk gun or none
Low
$5
Total
$90 to $125
If building a panel seems like too much to take on, consider building one of the smaller projects shown elsewhere on this page.
Is a DIY Panel System Right For You?
Do-it-yourselfers can buy kits that require little more than wiring the system to your utility grid, home power feed or designated appliances. Like any DIY project, you’ll do best if you choose an approach that matches your skill level and experience. Before you jump in and start buying parts, consider these three factors.
Decide How Much Power You Need to Generate
One skillset solar contractors use daily is calculating the amount of energy a client needs, and then matching that to panels and related electronics that will provide sufficient power at that location. You need to learn some basics about electricity, and how much electrical power different devices consume. See the LetsGoSolar page “How Solar Panels Work” to get a handle on how much power you need.
Permits & Utility Company Specs
In most municipalities, you must obtain a permit to construct a system for mounting anything on your roof or in your yard. Permit costs are usually small. Your county or utility may not allow you to mount home-built panels to your roof or electrical grid. Check with your utility and county before plunging headlong into large-scale DIY panel production.
Rebates and Tax Incentives for DIY Solar
While you’re looking at permits and specs, also check out what federal, state or municipal rebates might help with the cost of a DIY solar power system. Home-built panels may not qualify for incentives. Access the Database of State Incentives for Renewables and Efficiency (DSIRE) to learn more about rebates in your area.
Building DIY Solar Panels
1Create a work area
You’ll need a working area with a large flat worktable. Your tools include:
A saw and utility knife for cutting and trimming acrylic plastic; a hacksaw for cutting aluminum; a wood saw if you’re building a wooden assembly mount. A saw guide for making a clean 45-degree cut will be helpful
Crescent wrench and stainless steel bolts
Caulk gun and silicone caulk
Ruler or measuring tape
Needle-nose pliers and a wattage/amperage tester
Gloves so you won’t get oil, grease or dirt on the cells
A mask to protect yourself when cutting acrylic and using solder
2Plan your power
The most common cell is 1.75 watts, and the most common panel arrangement is 9 cells per row and 4 rows, totalling 36 cells and 63 watts of generated power. If you intend to generate more than 63 watts, you’ll need to build additional panels. A 1.75-watt cell is inexpensive: $1-$2. You can also purchase cells with higher wattage — the unit cost per cell is higher, but you’ll get more wattage per panel.
3Plan your panel
For your first panel, it’s a good idea to draw the layout on large sheets of paper so you can visualize all the parts and their location. Each 1.75-watt cell is 6″ x 3.25″. Leave .25″ between cells; .5″ at the sides and bottom; 2″ at the top for connecting wires. Your finished size for a 36-cell panel is 28.75″ x 36.25″
4Cut your panel facings
The front panel is clear acrylic or glass; the back is white acrylic. Cells are silicone-attached to the white acrylic panel. For a 36-cell panel, cut each panel to 28.75″ x 36.25″
5Purchase solar cells
You can buy solar cells on eBay, Amazon or other online sites. They are also available at some home improvement stores.
6Join and affix the cells
Solder the wires to join the cells in 4 rows of 9 cells. Each row is called a ‘”stringer.” Test if your wattage & voltage are correct. Then put a dollop of silicon from your caulk gun onto the center of the cell backing. Affix the cells to the white acrylic panel in rows. If the first row is all positives facing toward the top, the second row should be all negatives facing to the top, until you’ve done all 4 rows. This pattern is called “series wiring.”
7Connect the stringers
Use bus wire to reach from the first tab on the first stringer to the second tab of the second stringer and solder, positive to negative; repeat this sequence with a second bus wire from/to the second tabs of each cell. When complete, use tab wire to connect the two end tab wires together at the top of the panel.
8Attach junction box
Drill a hole at the top of the panel equal to the size of the chase nipple on the junction box. Apply a line of silicone around the edges and affix the junction box. Connect the junction box wiring to the stringers.
9Position the top panel
The clear acrylic top panel sits right on top of the cells.
10Add the frame
Cut 4 pieces of aluminum (or wood) frame to your measurements, with a 45-degree angle cut where the frame corners meet. Cut 3 holes in each aluminum frame siding, sized to your stainless steel bolts. Assemble the frame around your ‘sandwich’ of acrylic sheets and carefully drill holes through the two acrylic sheets. Use your stainless steel bolts, with washers, to lock your components in place.
11Seal the frame and add the inverter
Use your silicone gun to seal along all edges to ensure your solar panel is waterproof. If you’re adding an inverter, mount it onto the side of the frame.
12Mount your panel(s)
You can mount your panels on the roof of your house, garage or shed, or in the yard. Mount assembly will vary based on the location you’ve chosen. It could be a simple wood frame bolted to a roof or siding. Common yard assemblies are a wood frame affixed to fencing posts set in concrete. In any of these configurations, position the mount so it faces south, with your solar panels at a 30-degree angle to the sun. Cut back tree branches and other obstructions to maximize energy generation.
DIY Solar Cookers
Do you remember in elementary school science when the teacher used a magnifying glass to set a piece of paper on fire? If you do, you understand how a solar cooker works: it concentrates the sun’s rays to a particular location and transfers heat energy to a chosen object — your next meal.
The upsides of solar cooking are numerous:
Build a free-standing, independent alternative energy source
Cook any food dish with a solar cooker
Slow-cooked food uses less water and retains more vitamins and nutrients
No danger of an open flame, or the cleanup mess of charcoal or wood ash
Save money that would have gone to your utility company
Amaze your friends and have fun!
Building a solar cooker is easy — your elementary school class could have made one. As a DIYer, you can build a basic one in a few hours; or spend a full day and create a cooker that is durable, portable and highly efficient. Solar cookers are organized into roughly four design types.
Panel Cooker
Box Cooker
Tube Cooker
Parabolic Cooker
Temperature
300-350 F
285 F
500 F
Up to 650 F
Cooking type
Slow-cooking solids and liquids
Slow-cooking solids and liquids
Frying or broiling non-liquids
Frying or broiling non-liquids
Build difficulty
Easy
Easy
Difficult
Moderate
Cost to build
Low
Low
High
Varies
Since your solar cooker is entirely dependent on exposure to the sun, set up your cooker in a location that has maximum exposure, unhindered by tree branches and other obstructions. A porch or patio is ideal since you will be able to easily check on your cooker and adjust the lid or parabolic surface to maximize the concentration of solar energy on the cooking pot. While a solar cooker does not have an open flame like a barbeque grill, make sure there are no flammable materials within range of the solar cooker unit.
Store-Bought Solar Cookers
Building a box or panel solar cooker is remarkably easy and requires no special tools or components. Tube and parabolic designs are more complex and require purchased parts to maximize performance. Of course, you can suppress your DIY impulses, buy a solar cooker and get cooking!
Below is a sampling of solar cookers as they appear on Amazon. The list is representative of better models on the market and may include add-on features.
Product
Cooker Type
Limitations
Price
EzoWare Camping Stove Burner
Panel
Small size limits what can be cooked
$20
Sunflair Portable Solar Cooker
Panel
Durability of materials
$154
All American Sun Oven
Box
Must clean to remove plastic smell before using with foods
$300
Sun Oven Global Sun
Box
Must clean to remove plastic and paint smell before using with foods
$275
GoSun Sport
Tube
Difficult to boil water
$280
Happycamping Portable Solar BBQ Cooker
Tube
Durability of mount
$275
Haines Solar Cooker
Parabolic
Durability of materials
$80
OneEarth Designs
Parabolic
Expense
$500
DIY Panel Solar Cooker
The panel solar cooker is the easiest to make, with a design of a semi-circle of reflective panels that can be adjusted to focus the sun’s energy to the cooking pot. The panels can be inexpensive cardboard wrapped in foil or a more permanent structure, made from aluminum and wood with a mirrored side, or a car windshield Mylar reflector. The surface beneath the cooking pot should likewise be covered in a reflective surface to squeeze out more heat energy.
A panel cooker can generate up to 265 degrees Fahrenheit. Panel cooking, like box cooking, is slow cooking, roughly twice the time as required for conventional stove-top recipes. Cook rice in 2.25 hours; potatoes in 2.5 hours.
Build a cardboard panel cooker using a box cutter, foil and tape or liquid adhesive; a handsaw for wooden sides, hacksaw if metal; and tools to affix the hinged lid. You can design a panel cooker so it can fold in on itself, making it portable and easy to store.
DIY Box Solar Cooker
A box solar cooker is a simple design using a cardboard box with the interior sides covered in a reflective surface like foil or Mylar, and a hinged mirrored lid that can be adjusted to catch the sun’s rays. For a more durable unit, construct the box out of wood or other material. Refinements include higher-quality reflective materials and hinges.
Box cookers are similar in efficiency to the panel cookers, generating up to 285 degrees Fahrenheit. Foods cook more slowly than with a conventional oven or stovetop, so you’ll need to adjust your recipe time.
Build a cardboard model using a box cutter, foil, and tape or liquid adhesive; a wood one requires a handsaw, drill, pliers, screwdriver and screws. Add gaskets and/or sealant to waterproof. Box solar cookers are commonly a small 2 foot cube, although size can be increased to accommodate more than one cooking pot. A larger one is easy to transport and stow.
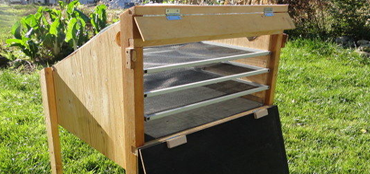
DIY Tube Solar Cooker
A tube solar cooker is similar in design to your outdoor grill — if your grill lid and interior had mirrored surfaces. But the primary element of a tube cooker is an evacuated glass tube, which is actually two tubes of blown glass inside one another, with the air entirely removed from the space between the tubes. Food is cut up and placed on a tray that fits inside the length of the tube.
Photo courtesy GoSun Stove
With the sun’s rays concentrated on the tube, the food cooks thoroughly and relatively quickly within the tube’s chamber. Tube cookers can generate up to 500 degrees Fahrenheit, so cook foods faster than box or panel models, but less than a parabolic cooker.
Building a tube cooker’s frame is relatively easy if you use a metal that can be fashioned into a curved half-circle surface that will concentrate the sun’s energy. Fashion a support for the evacuated glass tube with flanges. A refinement is to add a high-temperature plastic gasket to hold the tube in place. The tube cooker can sit on a mount constructed from metal or wood or, if you’re out on a hike, take your cooker along and scavenge for rocks, sand, dirt or other non-combustible materials for an impromptu mount.
Build a Parabolic Solar Cooker
A parabolic solar cooker is based on a design similar to a radar or satellite TV dish, with the reflective, adjustable dish on the bottom so that it focuses the sun’s energy on a cookpot on a stand or transom in the center.
A parabolic cooker is much more efficient than a box or panel model and can reach 650 degrees Fahrenheit, meaning cooking times are more similar to a conventional gas or electric stove burner and you can grill and fry. The downside of a parabolic cooker is its precision; the chef must adjust the reflectors every 15 to 30 minutes to maintain high temperatures.
You can create a parabolic cooker using cardboard surfaced in foil or Mylar, but to make the most of its potential, build the ‘petals’ of the parabolic surface from higher-quality reflective materials. A refinement is to add a solar tracking device that automatically adjusts the cooker’s reflective surfaces to the sun.
DIY Solar USB Chargers
The average U.S. citizen checks his or her cell phone 46 times a day. While you can question if people really need that many updates, you can’t question the need it creates: a USB phone charger.
People today also need a USB charger for their music players, watches, Kindles, and a host of other electronic devices. While the market is flooded with USB chargers for $20 or less, including solar-powered models, building your own is easy and fun.
We offer two scenarios: A solar USB charger mounted in a small box or tin with a solar panel tied to rechargeable AA batteries, or a solar USB charger with a solar panel tied to a larger battery.
Solar USB Charger tied to small rechargeable batteries
Glue gun and glue, and electrical tape or shrink-tape
Tin snips, scissors or an Exacto knife, depending on your choice of charge box
Process
Step 1
Connect a wire from the solar panel positive tab to the diode positive tab with solder. Do the same with a wire from negative to negative. Lay a strip of tape over the wiring to protect the connections
Step 2
Connect the solar panel wires to the battery pack wires with solder
Step 3
Solder the positive wire bundle to the positive anode on the board. Do the same with negative wires to the negative anode
Step 4
Make a hole in your charging box to extrude the USB port
Step 4
Use the glue gun to secure all components in the charging box
Step 6
Position the solar panel in a location that receives plenty of sunlight
Step 1
Solder one wire to the positive anode on the back of the solar cell, and a second wire to the negative anode
Step 2
Connect the positive and negative eyelet terminal feeds to the battery
Step 3
Connect the solar panel positive and negative wires to the controller with a screwdriver
Step 4
Connect the battery input/output plug connector to the controller
Step 5
Plug in a USB wire so it can connect to your device
Step 6
Optional: Buy a battery charger and connect it to the battery. Use this charger when solar energy is not available and you can connect your device to wall power.
Approximate cost
$30
$130
That’s it for both charger types! The solar cell will supply energy to the charge controller, which will flow to the battery. The battery provides a consistent flow of power through the charge controller to your device. When your device is not drawing power, your solar cell will send power to the battery, to help maintain the battery’s load. You can also link an inverter to your battery, and supply power to non-USB AC appliances.
Solar DIY Projects for Home, Garden and Camping
Your home, your phone, your food — what else can you do with solar? Here are some great DIY ideas to make your life better.
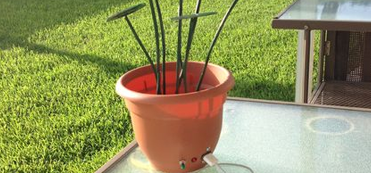
It looks like a potted plant, but the Solar Shrub is a USB solar charger. It uses eight 1.5-volt round solar cells attached to shrink-wrapped wires and clothes hangers to create an array capable of producing 5V at approximately 300mA.
Create a solar-powered lantern and add the artistic touch of cut-out designs on the sides. The lantern is lovely to look at and casts interesting shadows.
A fan in the attic circulates air and reduces trapped heat for the entire house. This setup uses a 10W solar panel and a standard fan and costs about $60.
Build a solar-powered environment that allows you to grow fruits and vegetables year-round, including cold winter months.
Resources
Top 10 DIY Projects that Harness the Power of the Sun: This online magazine bills itself as “Tips, tricks, and downloads for getting things done,” and you’ll find DIY projects and information on solar energy, canned frosting, and even how to improve your posture.
DIY Solar Power Projects: Great site for solar DIYers, offering clear instructions, a list of what you need and where to get it and photos of each project in progress.
Energy and Sustainability Projects: Make Magazine features hundreds of projects, from building your own solar panels and drones to growing crystals.
Mother Earth News Renewable Energy: One of the earliest advocates for green living, Mother Earth News publishes many DIY projects, including solar heat collectors, wind, and solar panels. This site often explains the concepts behind a project, as well as providing step-by-step instructions.
Build It Solar projects: A site perfect for the weekend DIYer, with a range of projects with varying ambition and complexity.